ADVERTORIAL
What is Dexcom G6?
• Overview: The Dexcom G6 is a state-of-the-art CGM system that continuously monitors glucose levels in real-time, providing users with up-to-date information about their blood sugar levels.
• Target Audience: Primarily designed for individuals with type 1 or type 2 diabetes, as well as those on insulin therapy who require close monitoring of their glucose levels.
• Components: The system consists of a small sensor that is inserted under the skin, a transmitter that sends data to a compatible device, and an app for data visualization.
Features of Dexcom G6
• Real-Time Glucose Monitoring: Provides continuous glucose readings every five minutes, allowing users to stay informed about their glucose levels throughout the day.
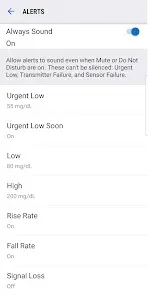
• Customizable Alerts: Users can set alerts for high and low glucose levels, helping to prevent potential health issues.
• No Fingerstick Calibration: The Dexcom G6 does not require fingerstick blood tests for calibration, making it more convenient for users.
• Bluetooth Connectivity: The system connects wirelessly to smartphones, tablets, and smartwatches, enabling easy access to data and alerts.
• User-Friendly App: The accompanying app displays glucose data, trends, and history, making it easy to track and manage diabetes.
• Sharing Capabilities: Users can share their glucose data with family members and healthcare providers, enhancing communication and support.
• Integration with Other Devices: Compatible with certain insulin pumps and diabetes management apps, allowing for streamlined data management.
Pros of Dexcom G6
• Convenience: Continuous monitoring reduces the need for frequent fingerstick tests, providing a hassle-free experience.
• Real-Time Data: Access to immediate glucose readings helps users make timely decisions regarding insulin and food intake.
• Customizable Alerts: Personalized alerts for hypo- and hyperglycemia can significantly enhance safety and awareness.
• Data Sharing: The ability to share glucose data with caregivers and healthcare providers fosters better communication and support.
• User-Friendly Interface: The app's intuitive design makes it easy for users to navigate and understand their glucose levels and trends.
Cons of Dexcom G6
• Cost: The Dexcom G6 can be expensive, and insurance coverage may vary, which could be a barrier for some users.
• Sensor Insertion: Some individuals may experience discomfort or skin irritation at the sensor insertion site.
• Limited Duration: The sensor is designed to last for up to 10 days, requiring regular replacements.
• Connectivity Issues: Users may encounter occasional connectivity problems between the transmitter and their devices.
• Learning Curve: New users may need time to familiarize themselves with the app and the system's functionalities.
Functions of Dexcom G6
• Glucose Level Monitoring: Continuously tracks glucose levels and provides real-time data and trends.
• Data Visualization: The app displays glucose data in easy-to-read graphs, showing trends over time and helping users recognize patterns.
• Alerts and Notifications: Sends alerts for high or low glucose levels, prompting users to take necessary action.
• Historical Data Tracking: Allows users to review past glucose levels and trends to inform dietary and medication choices.
• Integration with Fitness Apps: Syncs with other health and fitness apps to provide a more comprehensive view of overall health.
How to Use the Dexcom G6 App
Getting started with the Dexcom G6 system is simple. Here's a step-by-step guide to help you set it up and use the app effectively:
1 Download the App: Search for the Dexcom G6 app in the Google Play Store or Apple App Store. Download and install it on your mobile device.
2 Create an Account: Open the app and create an account. You may need to provide personal information and details about your diabetes management.
3 Insert the Sensor: Follow the instructions provided in the app to insert the glucose sensor under your skin. Ensure you choose a suitable location, typically on the abdomen or upper arm.
4 Attach the Transmitter: Once the sensor is in place, attach the transmitter to the sensor, which will begin sending data to the app.
5 Connect to Your Device: Ensure that Bluetooth is enabled on your smartphone and that the transmitter is connected to the app. This allows for real-time data transmission.
6 Customize Alerts: Set up personalized alerts for high and low glucose levels according to your preferences.
7 Monitor Glucose Levels: Regularly check the app for real-time glucose readings and trends. Review the data to understand your glucose patterns and make informed decisions.
8 Log Food and Activity: Use the app to log meals, physical activity, and insulin doses, which can help you track how these factors influence your glucose levels.
9 Review Historical Data: Access the historical data section of the app to analyze trends over days and weeks, aiding in better management of your diabetes.
10 Share Your Data: If desired, set up sharing options to allow family members or healthcare providers to access your glucose data for better support.


